Tool calling
Why tool calling?
Large language models (LLMs) are inherently good at drawing from their vast knowledge base to generate helpful responses based on a user prompt. However, they are not inherently good at or capable of everything. Some of their limitations can be addressed by equipping the LLM with the ability to call tools (i.e., functions). For example, LLMs are not inherently good at:
- Making precise, reliable, and reproducible calculations based on data.
- Accessing up-to-date, private, or otherwise “most relevant” information.
- Generally accomplishing programmatic tasks at the request of the user.
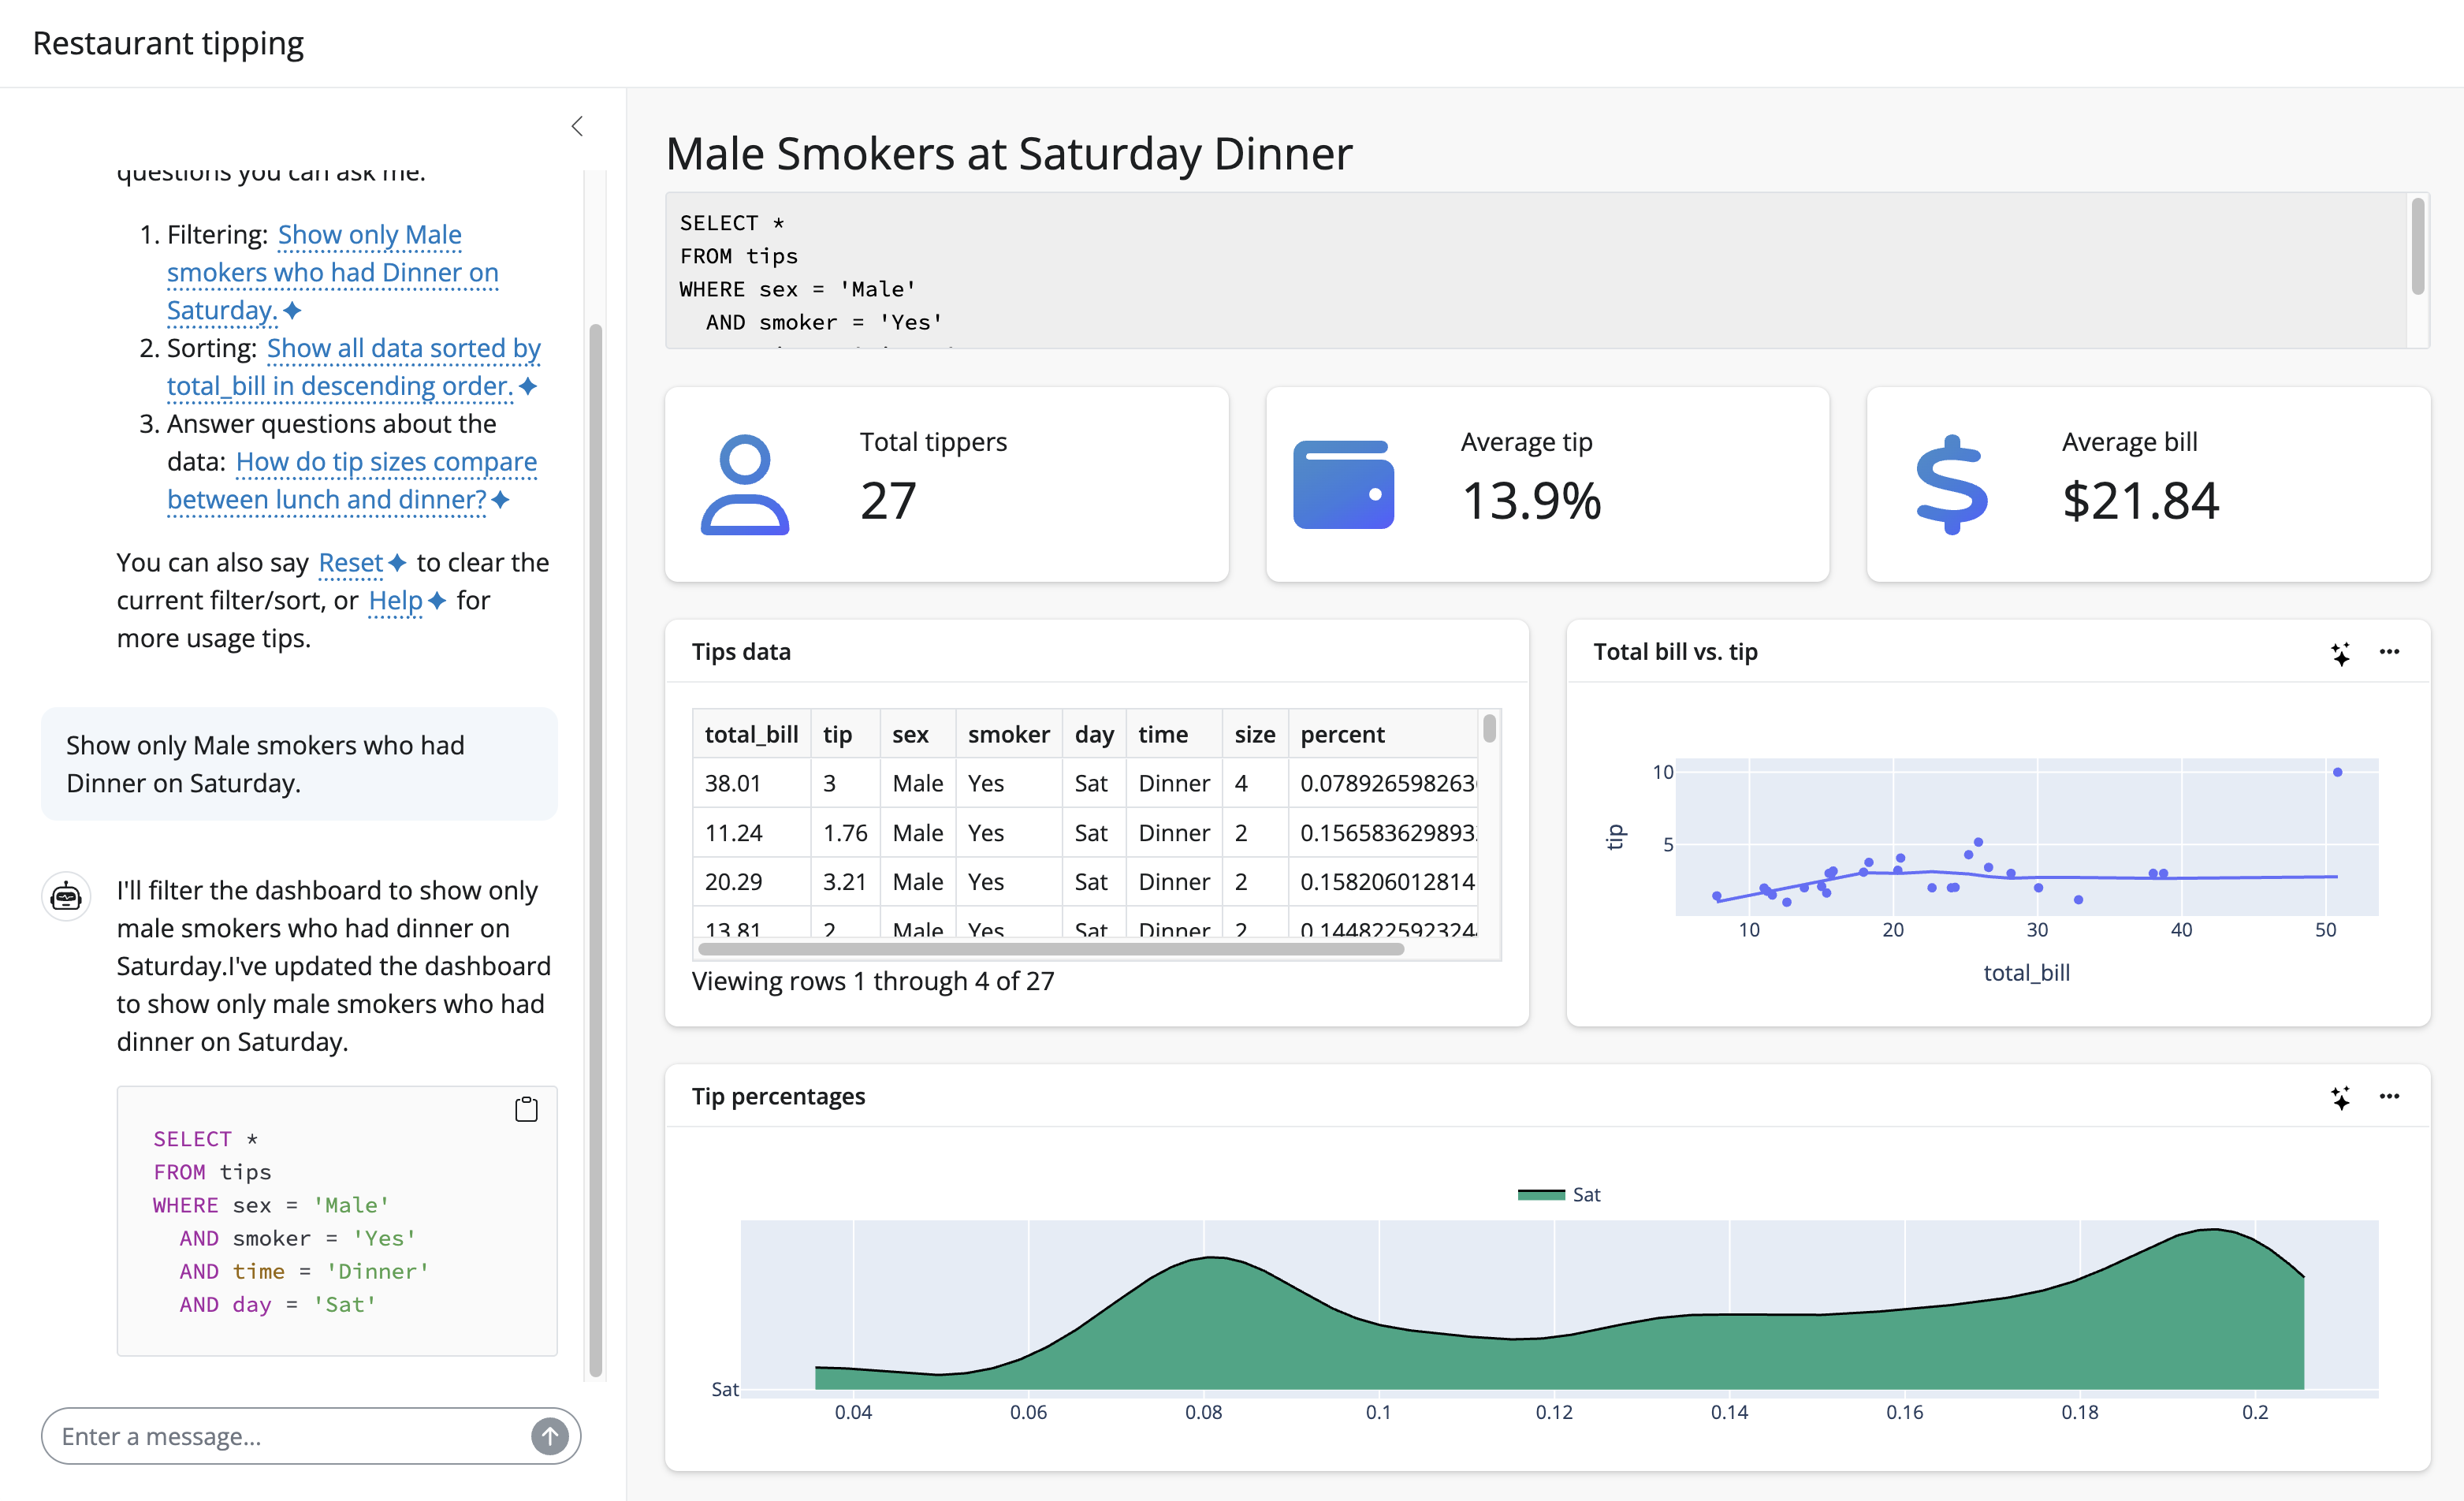
For a motivating example, consider the sidebot template. It allows end users to ask questions about a dataset using natural language, and see multiple views of the data update in real-time. It works by equipping the LLM with the context and tools to control the dashboard through SQL. And, since LLMs are inherently good at translating natural language to SQL, the result is a suprisingly effective (and verfiable!) way to explore data.
This article discusses the mechanics behind what makes an app like sidebot work. It covers:
- Get started with tool calls, including displaying status/results in Shiny.
- Combine tools with reactivity, enabling the LLM to “use” the app.
- Customize the display of tool calls.
Although this article focuses on using tool calling in a chatbot, the same ideas also apply to streaming markdown
Get started
Fundamentals
LLMs are trained on data up until a certain cutoff date, and they don’t natively have access to the internet. This means that they can’t answer questions about current events, weather, etc. Most LLMs nowadays are at least aware of this limitation:
from chatlas import ChatAnthropic
chat_client = ChatAnthropic()
chat_client.chat("What's the current temperature in Duluth, MN?")
I don’t have the ability to check the current temperature in Duluth, MN in real-time.
However, we can equip the LLM with a function to query current weather from a web API. Since LLMs are good at finding structure from unstructured input, we can have a tool that accepts lat/long as input, and the LLM is smart enough to infer a lat/long from a city name (or ask the user for lat/long).
Note also that the function includes type hints and a docstring. This is important because it helps the LLM understand what the function does and how to use it.
import requests
def get_current_weather(latitude: float, longitude: float):
"""Get the current current weather given a latitude and longitude."""
lat_lng = f"latitude={latitude}&longitude={longitude}"
url = f"https://api.open-meteo.com/v1/forecast?{lat_lng}¤t=temperature_2m,wind_speed_10m&hourly=temperature_2m,relative_humidity_2m,wind_speed_10m"
response = requests.get(url)
json = response.json()
return json["current"]
chat_client.register_tool(get_current_weather)
chat_client.chat("What's the current temperature in Duluth, MN?")The current temperature in Duluth, Minnesota is 0.9°C (which is approximately 33.6°F). There are also strong winds at 32.7 km/h (about 20.3 mph).
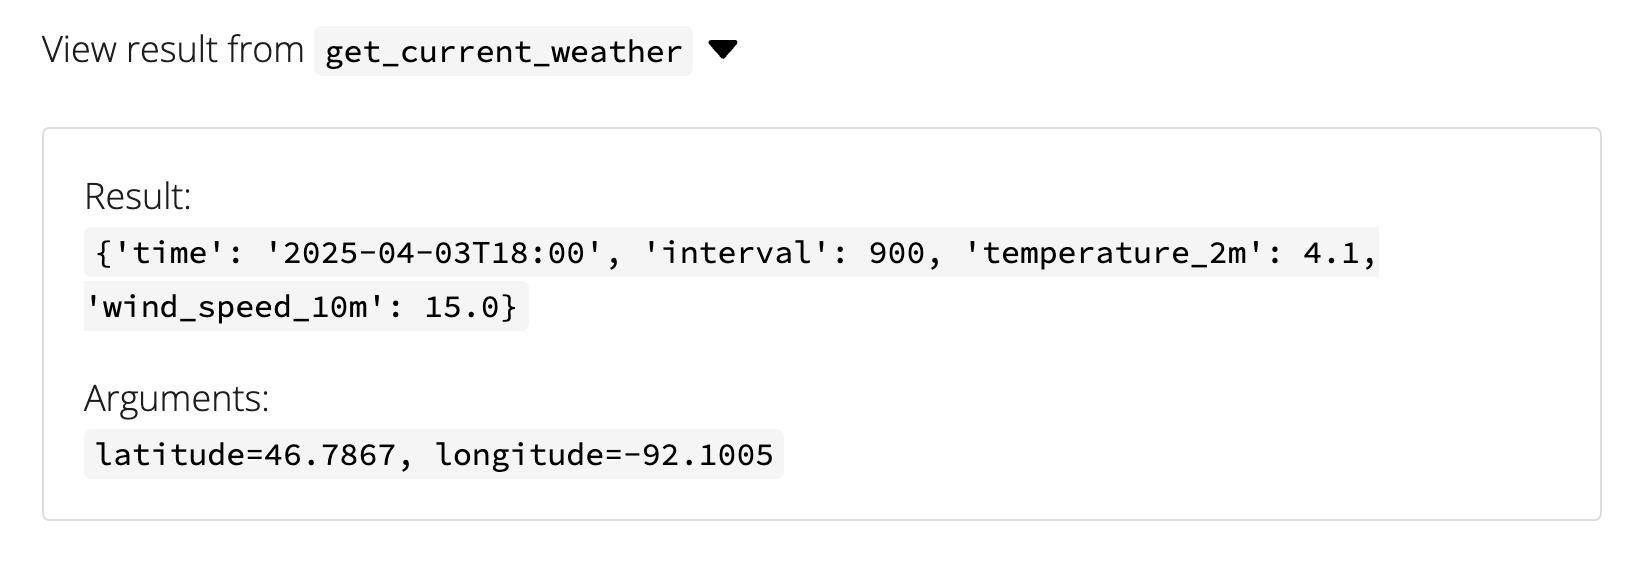
In .chat(), you can set echo="all" to see all the tool call information in your console. In the Tool displays, we’ll see how to display this information in the Shiny UI.
See the chatlas docs to learn more about tool calling fundamentals.
Basic chatbot
To embed our chat_client in a Shiny chatbot, let’s put it in a client.py module and use it for response generation. To display the tool call results, just set content="all" in the .stream_async() method. This way, chatlas will include tool call content objects in the stream, and since those content objects know how to display themselves in Shiny, we get a generic display of the tool request, response, and any errors that occurred.
client.py
import requests
from chatlas import ChatAnthropic
chat_client = ChatAnthropic()
def get_current_weather(latitude: float, longitude: float):
"""Get the current temperature given a latitude and longitude."""
lat_lng = f"latitude={latitude}&longitude={longitude}"
url = f"https://api.open-meteo.com/v1/forecast?{lat_lng}¤t=temperature_2m,wind_speed_10m&hourly=temperature_2m,relative_humidity_2m,wind_speed_10m"
response = requests.get(url)
json = response.json()
return json["current"]
chat_client.register_tool(get_current_weather)app.py
from client import chat_client
from shiny.express import ui

chat = ui.Chat(id="chat")
chat.ui(messages=["Hello! How can I help you today?"])

@chat.on_user_submit
async def _(user_input: str):
    response = await chat_client.stream_async(
      user_input,
      content="all"
    )
    await chat.append_message_stream(response)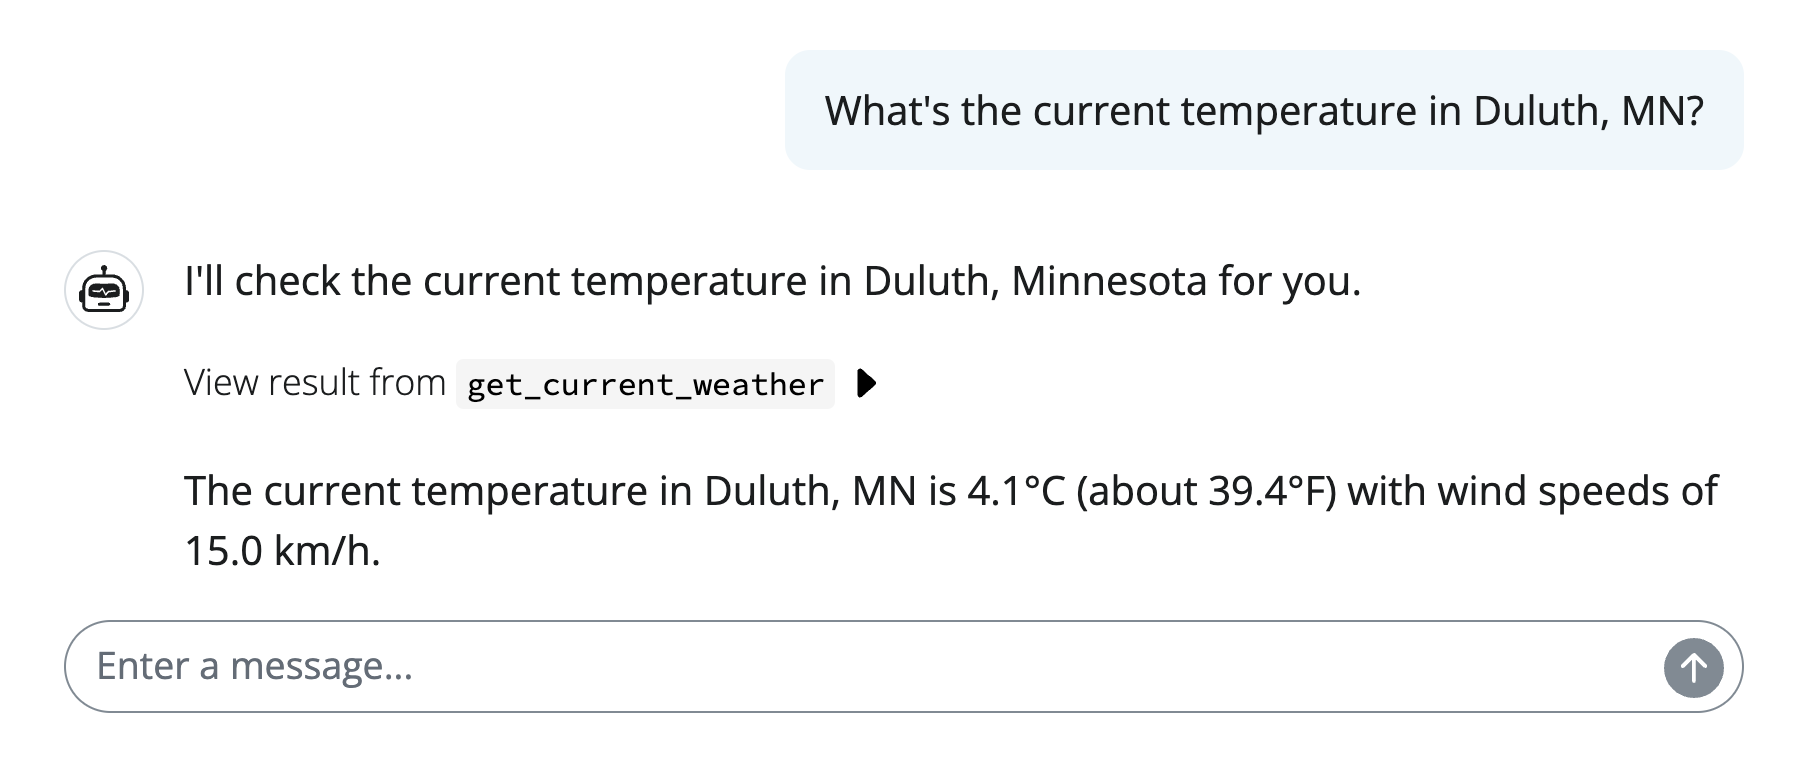
Once the tool call is made, you can expand the <details> of the tool call to see what the model requested for arguments as well as the result sent to the model.
Also, for tools that take a while to run, the user is notified of what tool is running along with a bouncing dot to indicate that the tool is still running.
And, in the case of an error, the user is also notified of the error.
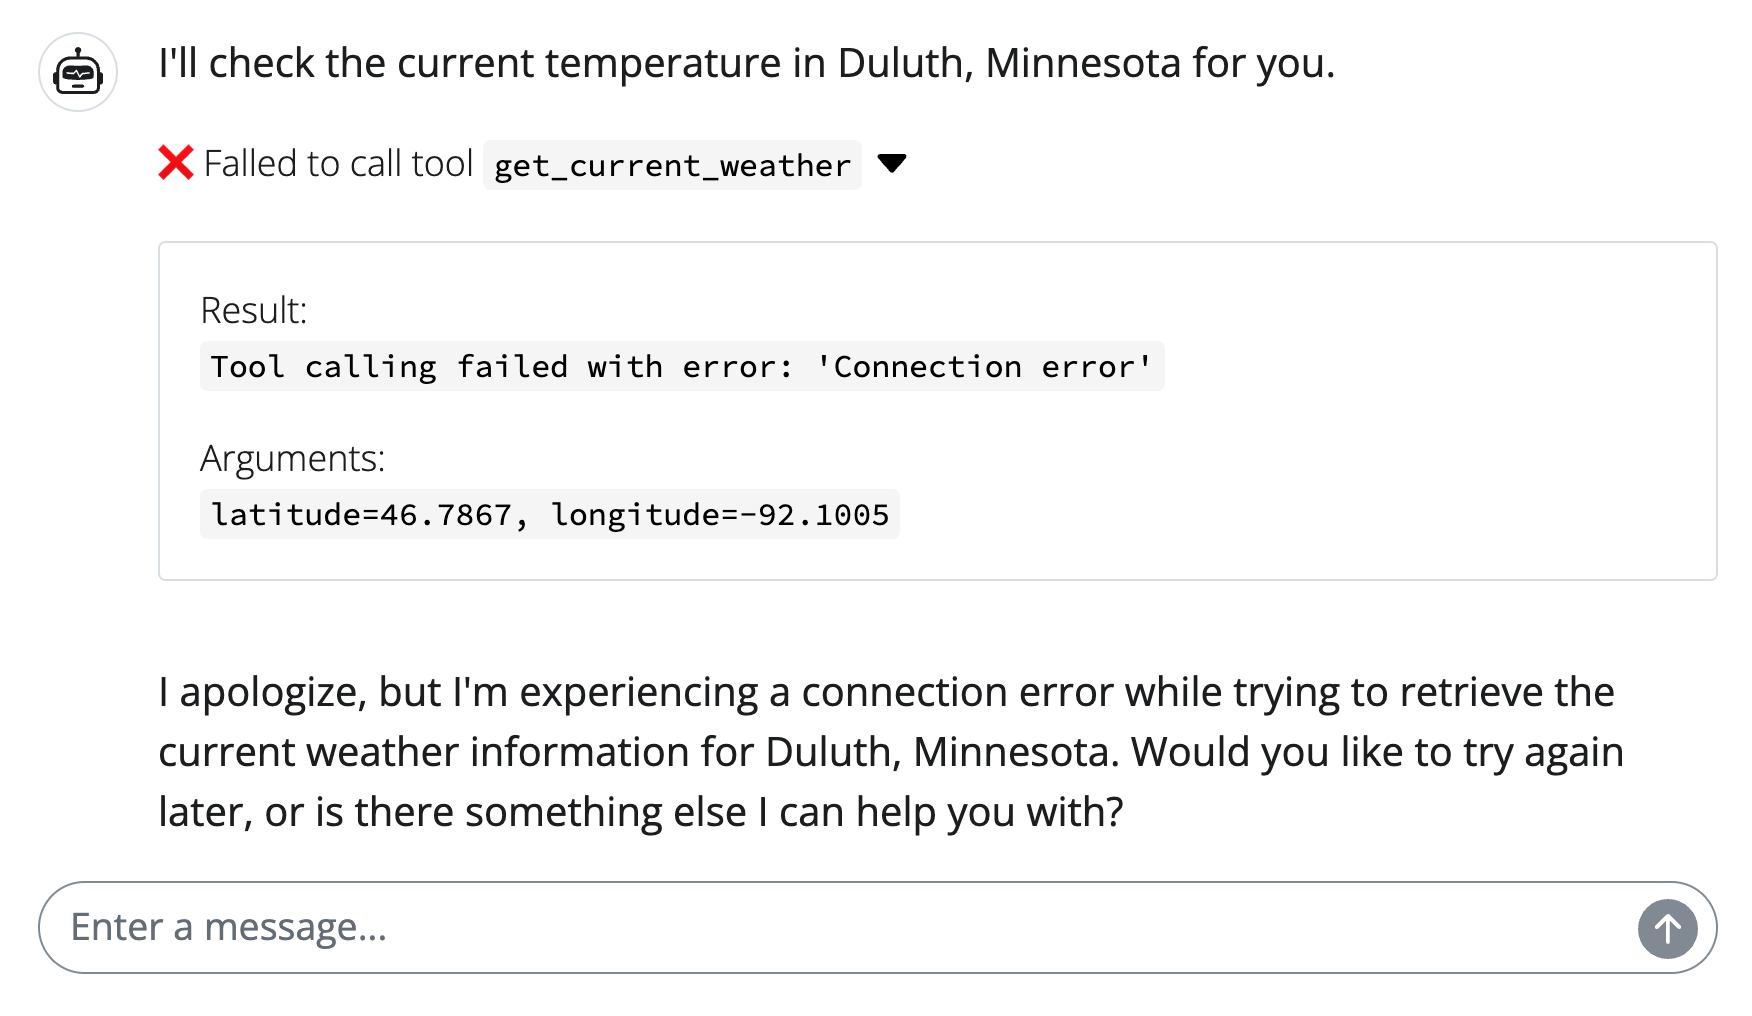
In general, these default displays should be enough to let your users know what the LLM is requesting/receiving to help generate their responses.
Reactivity
Combining tool calling with reactivity is a powerful technique that can effectively let the LLM interact with the app. Here, we’ll explore a few general patterns for doing this.
Updating inputs
The most basic way to hand over control to the LLM is to have it update reactive input(s). The core idea is to wrap a ui.update_*() call in a tool function and register that function with the chat_client. Then, when a user asks the LLM to update an input, it is able to do so.
client.py
from chatlas import ChatAnthropic
from shiny.express import ui

SLIDER_ID = "slider"

chat_client = ChatAnthropic(
    system_prompt=(
        "You are a helpful assistant in the sidebar of a Shiny app."
        "You have a tool available to you to update a slider in the main panel of the app."
    )
)

def update_slider(value: int):
    "Update the slider in the main panel with the provided value"
    ui.update_slider(SLIDER_ID, value=value)

chat_client.register_tool(update_slider)
app.py
from client import chat_client, SLIDER_ID
from shiny.express import ui

ui.input_slider(SLIDER_ID, "Value", value=50, min=0, max=100)

welcome = "Welcome! Try asking me to <span class='suggestion'>update the slider to 80</span> "

with ui.sidebar(width=350):
    chat = ui.Chat("chat")
    chat.ui(messages=[welcome])

@chat.on_user_submit
async def _(user_input: str):
    response = await chat_client.stream_async(user_input)
    await chat.append_message_stream(response)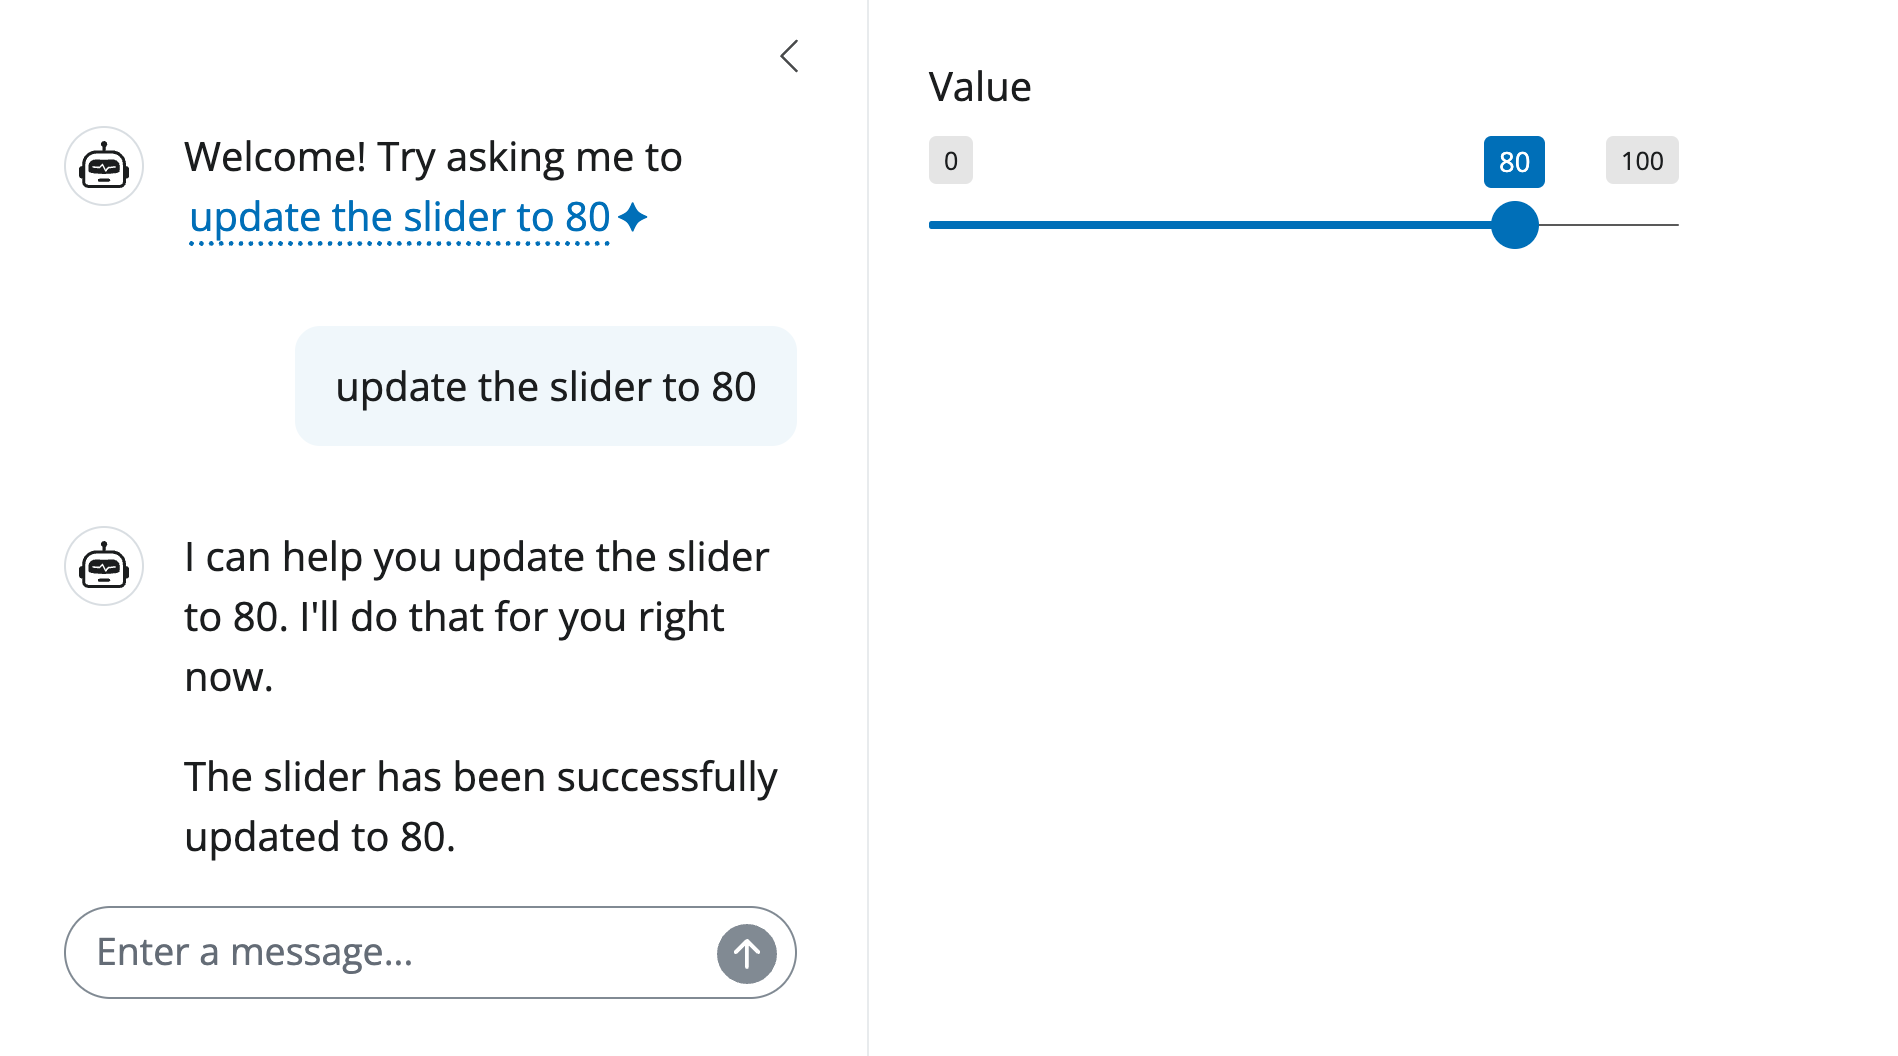
The basic example above illustrates the idea using minimal code, but the app itself is not particularly useful. For brevity sake, we won’t fully explore compelling applications here, but in general, updating inputs can be useful for:
- Navigating complex UI (i.e., lots of tabs, controls, etc)
- Allow users describe to what they want without finding it
- Combine with input suggestions to:
- Guide user to interesting states
- Save clicks
Managing state
In Shiny, a reactive value can derive from either an input component (e.g., ui.input_select(), etc.) or an entirely server-side reactive.value(). Generally speaking, the latter approach is useful for tracking state that may not exist in the UI (e.g., authentication, user activity, etc.). Similar to how we can equip the LLM to update an input component, we can also equip it to update a reactive value to have it drive the app’s state.
The sidebot template (mentioned at the top of this article) illustrates a particularly powerful application of managing state. In this case, the state is an SQL query. When that state changes, it triggers a reactive data frame (current_data) to be updated, which in turn updates all the downstream views of the data.
import duckdb
from shiny import reactive

# An SQL query
current_query = reactive.value("")

# Reactively execute the SQL query and
# return the result as a data frame
@reactive.calc
def current_data():
    if current_query() == "":
        return tips
    return duckdb.query(current_query()).df()
The LLM is also provided a tool (update_dashboard()) which takes an SQL query as input, and sets a new value for the current_query reactive value.
from typing import Annotated

async def update_dashboard(
    query: Annotated[str, 'A DuckDB SQL query; must be a SELECT statement, or "".']
):
    "Modifies the data presented in the data dashboard based on the provided SQL query"
    async with reactive.lock():
        current_query.set(query)
await reactive.flush()Since this tool runs within a non-blocking message stream (i.e., .append_message_stream()), in order to prevent race conditions, it must lock the reactivity graph when updating reactive value(s). If the tool were, instead, running in a blocking stream, the reactive.lock() and reactive.flush() wouldn’t be necessary.
The final crucial piece is that, in order for the LLM to generate accurate SQL, it needs to know the schema of the dataset. This is done by passing the table schema to the LLM’s system prompt.
Since the general pattern of having a tool to update a reactive data frame via SQL is so useful, the querychat package generalizes this pattern to make it more accessible and easier to use.
Custom tool display
Customizing how tool results are displayed can be useful for a variety of reasons. For example, you may want to style results differently, or implement something more sophisticated, such as displaying a map or a table.
Tool annotations
The simplest customization is to provide a display title for your tool via the annotations parameter of .register_tool(). This title appears in the tool call and result cards instead of the raw function name.
chat_client.register_tool(
    get_current_weather,
    annotations={"title": "Weather Forecast"},
)
ToolResultDisplay
For per-invocation customizations, have your tool function return a chatlas.ContentToolResult with a ToolResultDisplay in extra:
import faicons
import requests
from chatlas import ContentToolResult
from shinychat.types import ToolResultDisplay
def get_current_weather(latitude: float, longitude: float, location_name: str):
"""Get the current temperature given a latitude and longitude."""
lat_lng = f"latitude={latitude}&longitude={longitude}"
url = f"https://api.open-meteo.com/v1/forecast?{lat_lng}¤t=temperature_2m,wind_speed_10m"
response = requests.get(url)
json = response.json()
temp = json["current"]["temperature_2m"]
icon = "sun" if temp > 21 else ("snowflake" if temp < 7 else "cloud-sun")
return ContentToolResult(
value=json["current"],
extra={
"display": ToolResultDisplay(
title=f"Weather for {location_name}",
icon=faicons.icon_svg(icon),
)
},
)ToolResultDisplay supports several fields for customization:
| Parameter | Description |
|---|---|
title |
Title shown in the result card header. |
icon |
Icon shown alongside the title (any Shiny UI). |
html |
Custom HTML content to display instead of the raw result. |
markdown |
Custom Markdown string to display instead of the raw result. |
text |
Custom plain text to display instead of the raw result. |
open |
Whether the result details are expanded by default (default False). |
full_screen |
Whether to show a fullscreen toggle button (default False). |
show_request |
Whether to show the tool request details (default True). |
footer |
Optional HTML content for the card footer. |
Keep in mind that Shiny UI can be included in messages, so you can pass any Shiny component to html — including Jupyter Widgets like an interactive map:
Show code
import uuid
import ipywidgets
import requests
from chatlas import ContentToolResult
from ipyleaflet import CircleMarker, Map
from shinychat.types import ToolResultDisplay
from shinywidgets import output_widget, register_widget
def get_current_weather(latitude: float, longitude: float, location_name: str):
"""Get the current temperature given a latitude and longitude."""
lat_lng = f"latitude={latitude}&longitude={longitude}"
url = f"https://api.open-meteo.com/v1/forecast?{lat_lng}¤t=temperature_2m,wind_speed_10m"
response = requests.get(url)
json = response.json()
current = json["current"]
loc = (latitude, longitude)
info = (
f"<h6>Current weather</h6>"
f"Temperature: {current['temperature_2m']}°C<br>"
f"Wind: {current['wind_speed_10m']} m/s<br>"
f"Time: {current['time']}"
)
m = Map(center=loc, zoom=10)
m.add_layer(
CircleMarker(location=loc, popup=ipywidgets.HTML(info))
)
widget_id = f"weather_{uuid.uuid4().hex}"
register_widget(widget_id, m)
return ContentToolResult(
value=current,
extra={
"display": ToolResultDisplay(
html=output_widget(widget_id),
title=f"Weather for {location_name}",
show_request=False,
open=True,
full_screen=True,
)
},
)
Fully custom rendering
For complete control over the rendered output, subclass ContentToolResult and register a custom handler using @message_content_chunk.register. This lets you return any Shiny UI as the message content, completely replacing the default tool result card.
import faicons
import requests
from chatlas import ContentToolResult
from shinychat import message_content_chunk
from shinychat.types import ChatMessage
from shiny.ui import value_box
class WeatherResult(ContentToolResult):
location_name: str
@message_content_chunk.register
def _(message: WeatherResult):
temp = message.value["temperature_2m"]
wind = message.value["wind_speed_10m"]
content = value_box(
message.location_name,
f"{temp}°C",
f"Wind: {wind} m/s",
showcase=faicons.icon_svg("sun"),
full_screen=True,
)
return ChatMessage(content=content)
def get_current_weather(latitude: float, longitude: float, location_name: str):
"""Get the current temperature given a latitude and longitude."""
lat_lng = f"latitude={latitude}&longitude={longitude}"
url = f"https://api.open-meteo.com/v1/forecast?{lat_lng}¤t=temperature_2m,wind_speed_10m"
response = requests.get(url)
json = response.json()
return WeatherResult(
value=json["current"],
location_name=location_name,
)