Streaming
In this article, you’ll learn how to stream markdown/HTML content into your app via MarkdownStream(). This component is general purpose, but it’s particularly useful in a generative AI setting where displaying markdown strings as it’s being generated is a common requirement.
Compared to the Chat() component, MarkdownStream()’s API is simpler and focuses solely on a streaming display without the conversational UI elements. The possible experiences you can create around MarkdownStream() are vast, but as we’ll see shortly, a common pattern is populate a LLM prompt template based on user input.
Get started
Choose a template
Pick from the following LLM providers below to start your streaming markdown app. Copy & paste the relevant shiny create terminal command to get the relevant source files on your machine.
shiny create --template stream-ai-ollamashiny create --template stream-ai-anthropicshiny create --template stream-ai-openaishiny create --template stream-ai-geminishiny create --template stream-ai-anthropic-awsshiny create --template stream-ai-azure-openaishiny create --template stream-ai-langchainchatlas’s supports a wide variety of LLM providers including Vertex, Snowflake, Groq, Perplexity, and more. In this case, you can start from any template and swap out the chat_client with the relevant chat constructor (e.g., ChatVertex()).
If you’re not sure which provider to choose, chatlas provides a great guide to help you decide.
When you run the shiny create command, you’ll be provided some tips on where to go to obtain the necessary API keys (if any) and how to securely get them into your app.
Also, if you’re not ready to sign up for a cloud provider (e.g., Anthropic, OpenAI, etc), you can run models locally (for free!) with the Ollama template. This is a great way to get started and learn about LLMs without any cost, and without sharing your data with a cloud provider.
Once your credentials (if any) are in place, run the app. Congrats, you now have a streaming markdown interface powered by an LLM of your choice! 🎉
Inspect the code
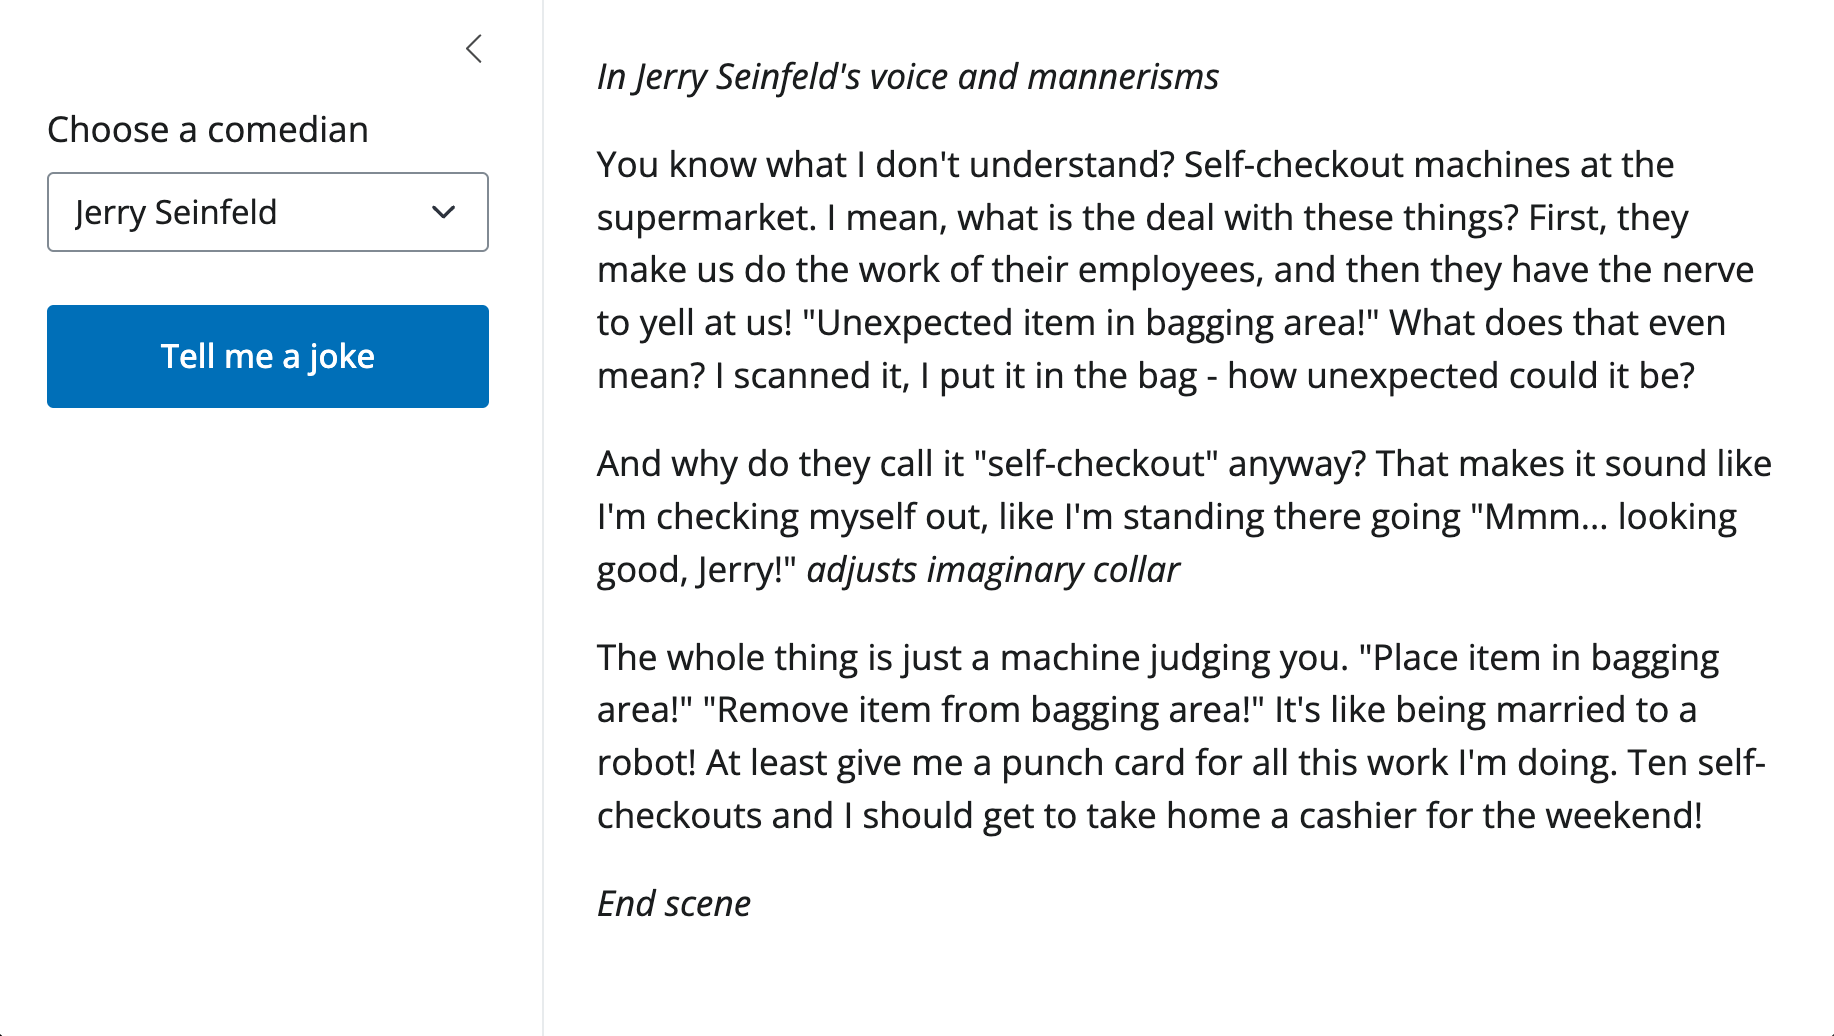
Go ahead and open the app.py file from your template, you’ll see something roughly like this:
from chatlas import ChatOllama
from shiny import reactive
from shiny.express import input, ui

# Might instead be ChatAnthropic, ChatOpenAI, or some other provider
chat_client = ChatOllama(model="llama3.2")

with ui.sidebar():
    ui.input_select(
        "comic",
        "Choose a comedian",
        choices=["Jerry Seinfeld", "Ali Wong", "Mitch Hedberg"],
    )
    ui.input_action_button("go", "Tell me a joke", class_="btn-primary")

stream = ui.MarkdownStream(id="my_stream")
stream.ui(
    content="Press the button and I'll tell you a joke.",
)

@reactive.effect
@reactive.event(input.go)
async def do_joke():
    prompt = f"Pretend you are {input.comic()} and tell me a funny joke."
    response = await chat_client.stream_async(prompt)
    await stream.stream(response)
from chatlas import ChatOllama
from shiny import App, reactive, ui
app_ui = ui.page_sidebar(
ui.sidebar(
ui.input_select(
"comic",
"Choose a comedian",
choices=["Jerry Seinfeld", "Ali Wong", "Mitch Hedberg"],
),
ui.input_action_button("go", "Tell me a joke"),
),
ui.output_markdown_stream("my_stream"),
)
def server(input):
stream = ui.MarkdownStream(id="my_stream")
chat_client = ChatOllama(model="llama3.2")
@reactive.effect
@reactive.event(input.go)
async def do_joke():
prompt = f"Pretend you are {input.comic()} and tell me a funny joke."
response = await chat_client.stream_async(prompt)
await stream.stream(response)
app = App(app_ui, server)From here, we can see the key requirements for streaming from an LLM:
- Initialize a
chat_client(e.g.,ChatOllama()) to interact with the LLM.chatlasisn’t required for this, but it’s highly recommended.
- Initialize a
MarkdownStream()component. - Display it’s UI element with
stream.ui().- Here you can specify initial content, sizing, and more.
- Define the action which triggers the LLM to generate content.
- In this case, it’s a button click that prompts the LLM to generate a joke.
- Here,
chat_clientgenerates aresponsestream, which is passed along to the.stream()method for display.
In this article, our primary focus is the UI portion of the markdown stream (i.e., stream). That said, since LLM model choice and prompt design are so important for generating good responses, we’ll briefly touch on that first.
Models & prompts
With chatlas, it’s very easy to switch between the model and system prompt behind your chat_client. Just change the model and system_prompt parameters:
chat_client = ChatOllama(
  model="llama3.2",
  system_prompt="You are a helpful assistant",
)
If you’re new to programming with LLMs, we highly recommend visiting the chatlas website for guidance on where to start, choosing a model, and designing an effective system prompt.
If you’re not yet ready learn about LLMs, that’s okay! We can still dive into stream UI features without knowing much about LLMs.
Content APIs
Starting content
Show content to the user when the MarkdownStream() UI is first displayed by providing a string to the content parameter in stream.ui().
This is typically most useful for providing a welcome message or instructions to the user.
stream.ui(
  content="Press the button and I'll tell you a joke."
)
ui.output_markdown_stream(
content="Press the button and I'll tell you a joke."
)
Appending content
When you .stream() content, you have the choice of whether or not to clear the existing content. By default, existing content is cleared, but you can instead append to the existing content by passing clear=False to stream.stream().
await stream.stream(response, clear=False)Content generators
In your starter template, the response stream is provided by chatlas via chat_client.stream_async(prompt). As it turns out, that response object is an generator of markdown strings, and the .stream() method can work with any generator of strings. This is useful to know if you want to:
- Use another framework for reponse generation (e.g., LangChain).
- Transform the stream as it’s being generated (e.g., highlight keywords).
- Manually create a generator (to say, show progress on a non-blocking task).
#| '!! shinylive warning !!': |
#|   shinylive does not work in self-contained HTML documents.
#|   Please set `embed-resources: false` in your metadata.
#| standalone: true
#| components: [editor, viewer]
#| layout: vertical
#| viewerHeight: 150
#| editorHeight: 250
import asyncio

from shiny import reactive
from shiny.express import input, ui

ui.input_action_button("do_stream", "Do stream", class_="btn btn-primary")

stream = ui.MarkdownStream("stream")
stream.ui()

async def simple_generator():
    yield "Hello "
    await asyncio.sleep(1)
    yield "`MarkdownStream()`!"

@reactive.effect
@reactive.event(input.do_stream)
async def _():
    await stream.stream(simple_generator())
Content types
MarkdownStream() supports several different content types through the content_type parameter. The default markdown content type is the most broadly useful, since it not only parses and renders markdown strings, but also renders HTML content.
markdown: render markdown (specifically CommonMark) as HTML.- Currently, you can’t customize the markdown renderer. If you need to customize, apply
ui.markdown()to the content before streaming.
- Currently, you can’t customize the markdown renderer. If you need to customize, apply
html: render a string of HTML as HTML.text: render a string of plain text verbatim.semi-markdown: render a string of markdown as HTML, but with HTML tags escaped.
Interactive content
Similar to Chat(), MarkdownStream() supports interactive content, meaning that content can include Shiny UI elements like inputs, outputs, etc. This allows you to collect user input, display rich interactive output (e.g., Jupyter Widgets), or provide additional context (e.g. tooltips) from within the message stream.
For a basic example, here’s a startup message with an input field:
#| '!! shinylive warning !!': |
#|   shinylive does not work in self-contained HTML documents.
#|   Please set `embed-resources: false` in your metadata.
#| standalone: true
#| components: [editor, viewer]
#| layout: vertical
#| viewerHeight: 300
from shiny.express import ui

with ui.hold() as welcome:
    "**Hello!** What's your name?"
    ui.input_text("name", None, placeholder="Enter name here")

chat = ui.Chat(id="chat")
chat.ui(messages=[welcome])Probably the most interesting way in which interactive messages can be used is from a custom tool call display. For example, you could have a tool that displays a Data Grid or Jupyter Widget (e.g., a plotly graph).
Card layout
When embedding a stream within a larger app, it’s often useful to place it within a ui.card(). This provides a clear visual separation between the stream and other content, and allows you to easily add a header, footer, or other elements around the stream.
In this case, it’s also useful to know that a sidebar layout can also placed within a card:
from shiny.express import ui

# Get the card to fill the page
ui.page_opts(
    fillable=True,
    fillable_mobile=True,
    class_="bg-light-subtle",
)

# Create and display a MarkdownStream()
stream = ui.MarkdownStream(id="my_stream")

with ui.card():
    ui.card_header("Streaming Joke Generator")

    # Put sidebar layout in the card
    with ui.layout_sidebar():
        with ui.sidebar():
            ui.input_select(
                "comic",
                "Choose a comedian",
                choices=["Jerry Seinfeld", "Ali Wong", "Mitch Hedberg"],
                width="auto",
            )
            ui.input_action_button("go", "Tell me a joke", class_="btn-primary")

        stream.ui(content="Press the button and I'll tell you a joke.")
from shiny import ui, App
from faicons import icon_svg
app_ui = ui.page_fillable(
ui.card(
ui.card_header("Streaming Joke Generator"),
ui.layout_sidebar(
ui.sidebar(
ui.input_select(
"comic",
"Choose a comedian",
choices=["Jerry Seinfeld", "Ali Wong", "Mitch Hedberg"],
width="auto",
),
ui.input_action_button("go", "Tell me a joke", class_="btn-primary"),
),
ui.output_markdown_stream("stream", content="Press the button and I'll tell you a joke."),
),
),
fillable_mobile=True,
class_="bg-light",
)
def server(input):
stream = ui.MarkdownStream(id="stream")
app = App(app_ui, server)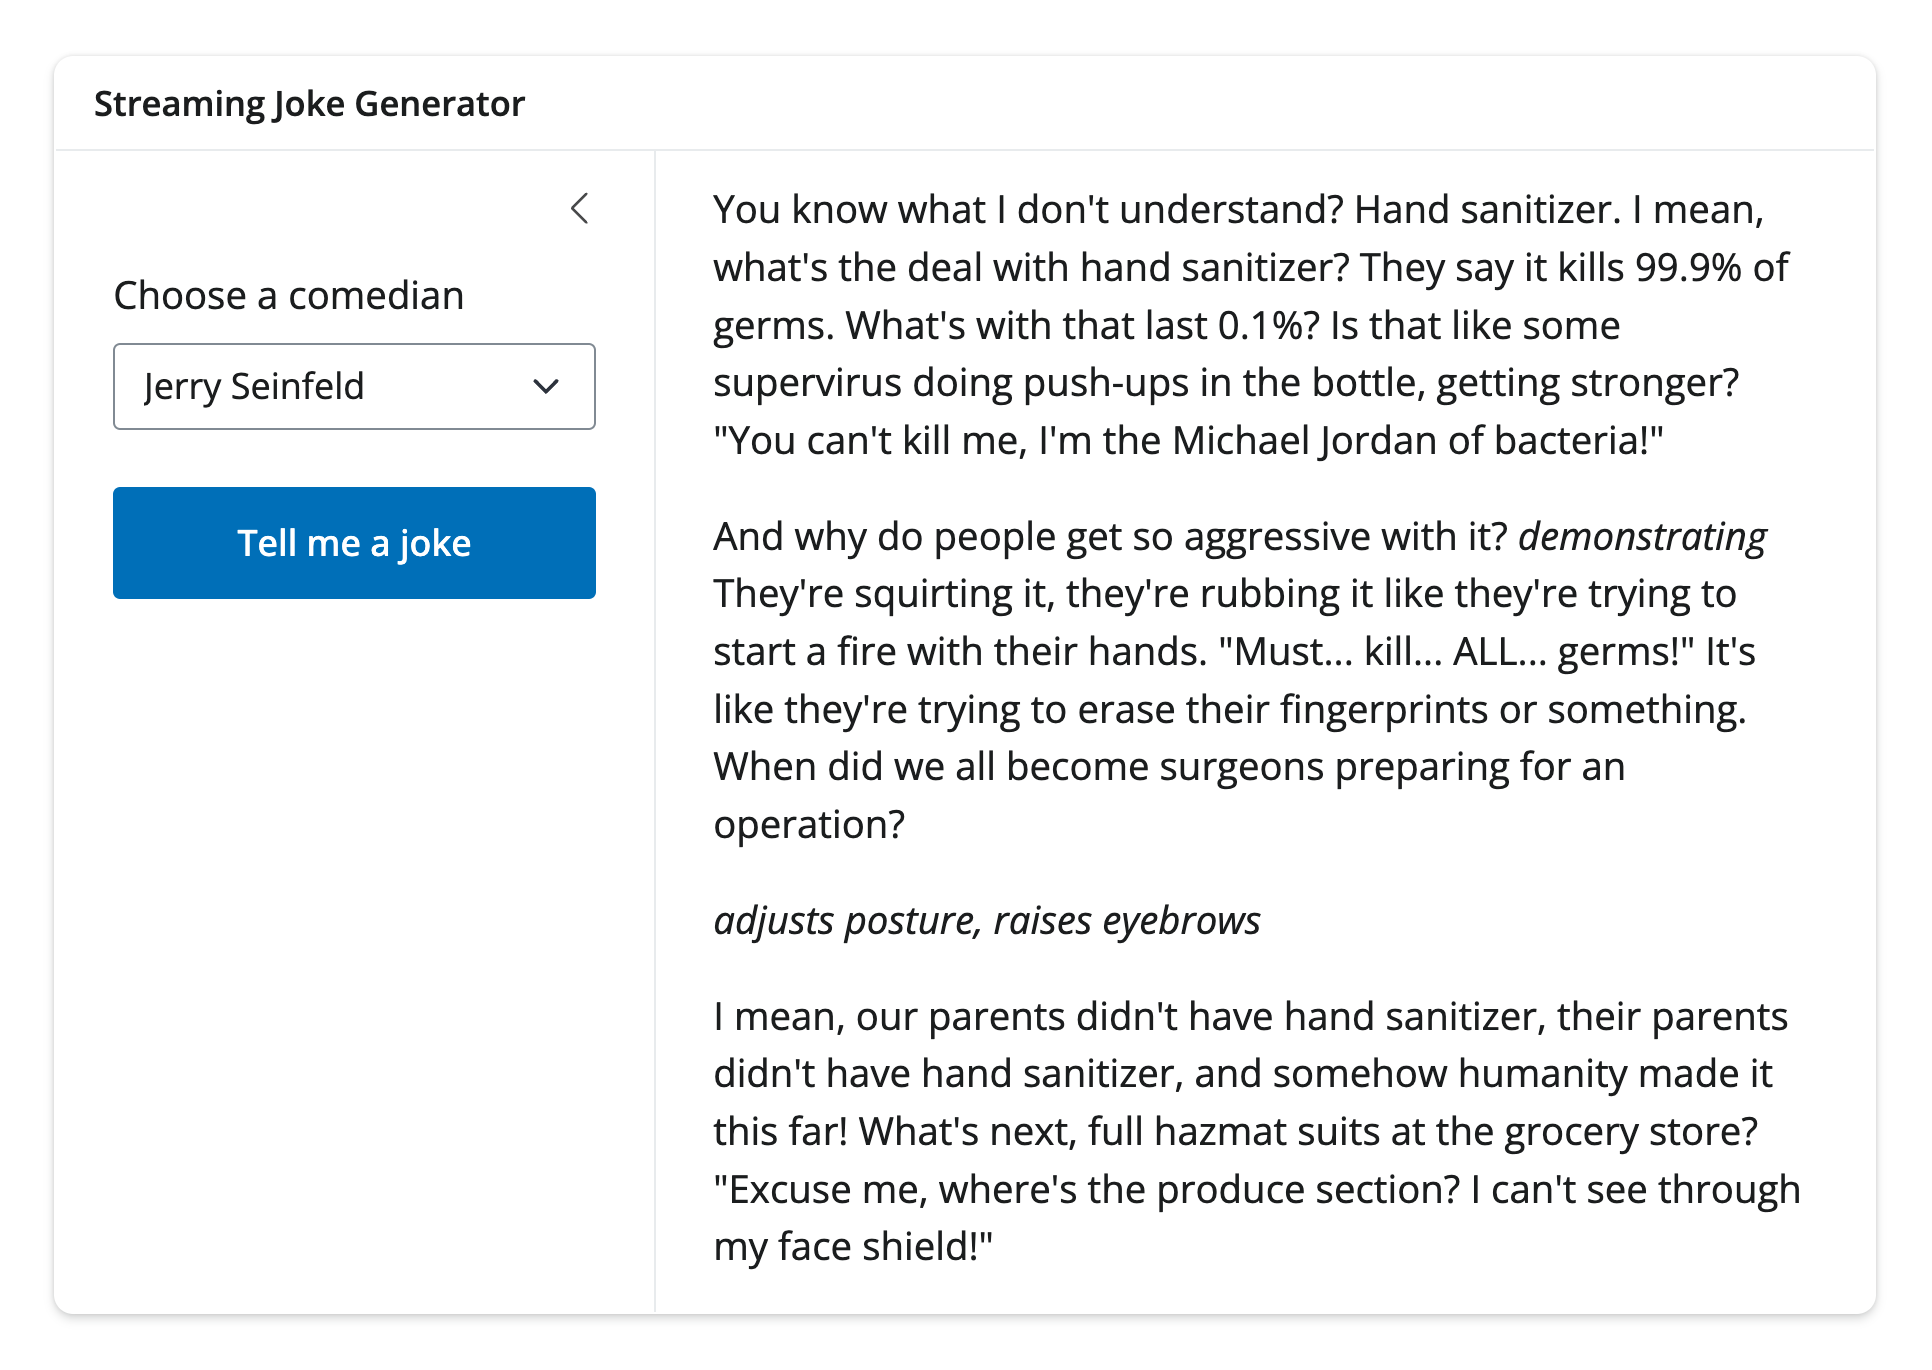
If you want multiple cards in an app, it’s useful to know about Shiny’s grid layout options.
A nice result of placing a stream in a card is that when it overflows the card (either because it has a specified height or because it’s in a fillable page), the card will automatically scroll to show the new content.
This can be disabled by setting auto_scroll=False when creating the UI element.
Non-blocking streams
Similar to Chat()’s .append_message_stream(), MarkdownStream()’s .stream() launches a non-blocking extended task. This allows the app to be responsive while the AI generates the response, even when multiple concurrent users are on a single Python process.
A few other benefits of an extended task is that they make it easy to:
- Reactively read for the
.result(). - Reactively read for the
.status(). .cancel()the stream.
To grab the latest message stream, read the .latest_stream property on the stream object. This property always points to the most recent stream, making it easy to work with it in a reactive context. Here’s an example of reactively reading the status and result of the latest stream:
#| '!! shinylive warning !!': |
#|   shinylive does not work in self-contained HTML documents.
#|   Please set `embed-resources: false` in your metadata.
# | standalone: true
# | components: [editor, viewer]
# | layout: vertical
# | viewerHeight: 350
# | editorHeight: 300

## file: app.py
from app_utils import stream_generator
from shiny import reactive
from shiny.express import input, render, ui

stream = ui.MarkdownStream("stream")

ui.input_action_button("start_stream", "Start stream", class_="btn-primary")

@render.code
def stream_status():
    return f"Status: {stream.latest_stream.status()}"


stream.ui(content="Press the button to start streaming.")


@render.text
async def stream_result():
    return f"Result: {stream.latest_stream.result()}"


@reactive.effect
@reactive.event(input.start_stream)
async def _():
    await stream.stream(stream_generator())


## file: app_utils.py
import asyncio


async def stream_generator():
    for i in range(5):
        await asyncio.sleep(0.5)
        yield f"Message {i} \n\n"
Providing good UI/UX for canceling a stream is a bit more involved, but it can be done with a button that cancels the stream and notifies the user. See the example below for an approach to this:
#| '!! shinylive warning !!': |
#|   shinylive does not work in self-contained HTML documents.
#|   Please set `embed-resources: false` in your metadata.
# | standalone: true
# | components: [editor, viewer]
# | layout: vertical
# | viewerHeight: 350
# | editorHeight: 300

## file: app.py
from app_utils import stream_generator

from shiny import reactive
from shiny.express import input, ui


with ui.layout_column_wrap():
    ui.input_action_button(
        "do_stream",
        "Start stream",
        class_="btn btn-primary",
    )

    ui.input_action_button(
        "cancel",
        "Cancel stream",
        class_="btn btn-danger",
    )

stream = ui.MarkdownStream("stream")
stream.ui(content="Press the button to start streaming.")


@reactive.effect
@reactive.event(input.do_stream)
async def _():
    await stream.stream(stream_generator())


@reactive.effect
@reactive.event(input.cancel)
def _():
    stream.latest_stream.cancel()
    ui.notification_show("Stream cancelled", type="warning")


@reactive.effect
def _():
    ui.update_action_button(
        "cancel", disabled=stream.latest_stream.status() != "running"
    )


## file: app_utils.py
import asyncio


async def stream_generator():
    for i in range(3):
        await asyncio.sleep(0.75)
        yield f"Message {i} \n\n"
Troubleshooting
Error handling
Usually, when an error occurs in a reactive.effect, the error crashes the app, forcing the user to refresh the page. This behavior is intentional since, when an error occurs in a reactive.effect, the user isn’t notified of the error, and the app is in an unknown state.
Since LLM response generation can be flaky (e.g., due to rate/context limits, network issues, etc), you may want to handle errors during response more gracefully.
As it turns out, when an error occurs inside a .stream(), the error is caught and re-thrown by a special NotifyException which notifies the user of the error, and allows the app to continue running. When running locally, the actual error message is shown, but in production, only a generic message is shown (i.e., the error is sanitized since it may contain sensitive information).

This is should be good enough to catch most errors that occur during response generation. However, it’s also good to be aware though that other errors that might occur elsewhere in a reactive.effect will still crash the app. If you’d like to protect against this, you can wrap them in a try/except block, and re-raise the error as a NotifyException, like this:
from shiny.types import NotifyException
from shiny import reactive

@reactive.effect
@reactive.event(input.go)
async def do_joke():
    try:
        prompt = f"Pretend you are {input.comic()} and tell me a funny joke."
        response = await chat_client.stream_async(prompt)
    except Exception as e:
        raise NotifyException(f"An error occurred in do_joke: {e}") from e
await stream.stream(response)If you’d like to customize how MarkdownStream() handles errors, you can do so by setting the on_error parameter in the constructor. See the documentation.
Debugging
Sometimes response generation from an LLM might not be quite what you expect, leaving you to wonder what went wrong. With chatlas, your primary interactive debugging tool is to set echo="all" in the .stream_async() method to see the context of the chat history (emitted to your Python console). For lower-level debugging, you can also enable logging and/or access the full chat history via the chat_client.get_turns() method. For more, see chatlas’ troubleshooting guide.
Since chatlas builds on top of official Python SDKs like openai and anthropic, monitoring solutions that integrate with their logging mechanism can be used to monitor and debug your chatbot in production.
Next steps
The next article covers a very useful technique for both chatbots and streaming markdown: tool calling.
Skip to other articles in the series if you want to learn about other generally useful Generative AI techniques like tool calls, structured output, and RAG.