Shiny Gadgets
Shiny was originally conceived as a medium for interactively communicating ideas and results. As the author of a Shiny app, you perform your analysis or build your models, and then write a Shiny app to let other people–especially those without R expertise–explore your findings or data.
Shiny Gadgets are different. Gadgets are interactive tools that enhance your R programming experience.
Where a Shiny app represents the output of an analysis, Shiny Gadgets are designed to be used in the course of analysis.
Where Shiny apps are designed to be used by end users, Shiny Gadgets are intended to be used by R users.
Where Shiny apps are ultimately intended to be deployed on servers (like Shiny Server or ShinyApps.io) and accessed via a web browser, Shiny Gadgets are only ever intended to be invoked from code (in the R console or from an R script) or from within RStudio.
Shiny Gadgets can be registered with RStudio as Addins, which makes them easy to discover and use in the GUI.
Potential uses
Shiny Gadgets could be created for most any task you might do during data loading, cleaning, manipulation, and visualization. Here are just a few ideas:
- An easy-to-use UI for downloading data from a complicated API and turning it into a data frame
- A tool to preview regular expressions for find/replace (
subandgsub) - Visual selection tools for subsetting or outlier exclusion
Writing Shiny Gadgets
If you know how to write Shiny apps, you already know almost everything you need to write Shiny Gadgets, too. You still define UI, and provide a function for the server logic. You use the same reactive programming paradigm.
The main difference is how your UI and server logic is packaged. While Shiny apps generally have their own app directory (containing either ui.R/server.R files or a single app.R file), Shiny Gadgets are defined right inside a regular function.
Here’s a skeleton:
library(shiny)
library(miniUI)

myGadgetFunc <- function(inputValue1, inputValue2) {

  ui <- miniPage(
    gadgetTitleBar("My Gadget"),
    miniContentPanel(
      # Define layout, inputs, outputs
    )
  )

  server <- function(input, output, session) {
    # Define reactive expressions, outputs, etc.

    # When the Done button is clicked, return a value
    observeEvent(input$done, {
      returnValue <- ...
      stopApp(returnValue)
    })
  }

  runGadget(ui, server)
}
As you can see, the ui and server variables are very recognizably Shiny constructs, but they’re created right inside the gadget function. The fact that they’re created inside the gadget function is important, because it means they can directly access the function’s arguments (inputValue1, inputValue2), and the return value from runGadget can be the return value for the function.
You might also have noticed that the ui definition uses miniPage and miniContentPanel instead of the more familiar fluidPage, sidebarLayout, etc. That’s because gadgets default to running in the RStudio Viewer pane, which is much smaller than a typical browser window. Given the smaller real estate, it makes less sense to use the usual layout constructs in Shiny, so the miniUI package provides different layout functions that make better use of the available space. We’ll go into more detail about this below.
The gadgetTitleBar call adds a bar across the top of your app that includes the title, plus Cancel and Done buttons. You handle the Done button as shown in the code above, but Cancel is automatically implemented by the runGadget call by stopping the app with a "User cancel" error. While this default behavior should be appropriate for almost all gadgets, if you prefer a different behavior for the Cancel button, call runGadget(ui, server, stopOnCancel = FALSE) and handle input$cancel yourself. For example, add a block like this to the server function to return NULL instead of erroring:
observeEvent(input$cancel, {
  stopApp(NULL)
})
Example
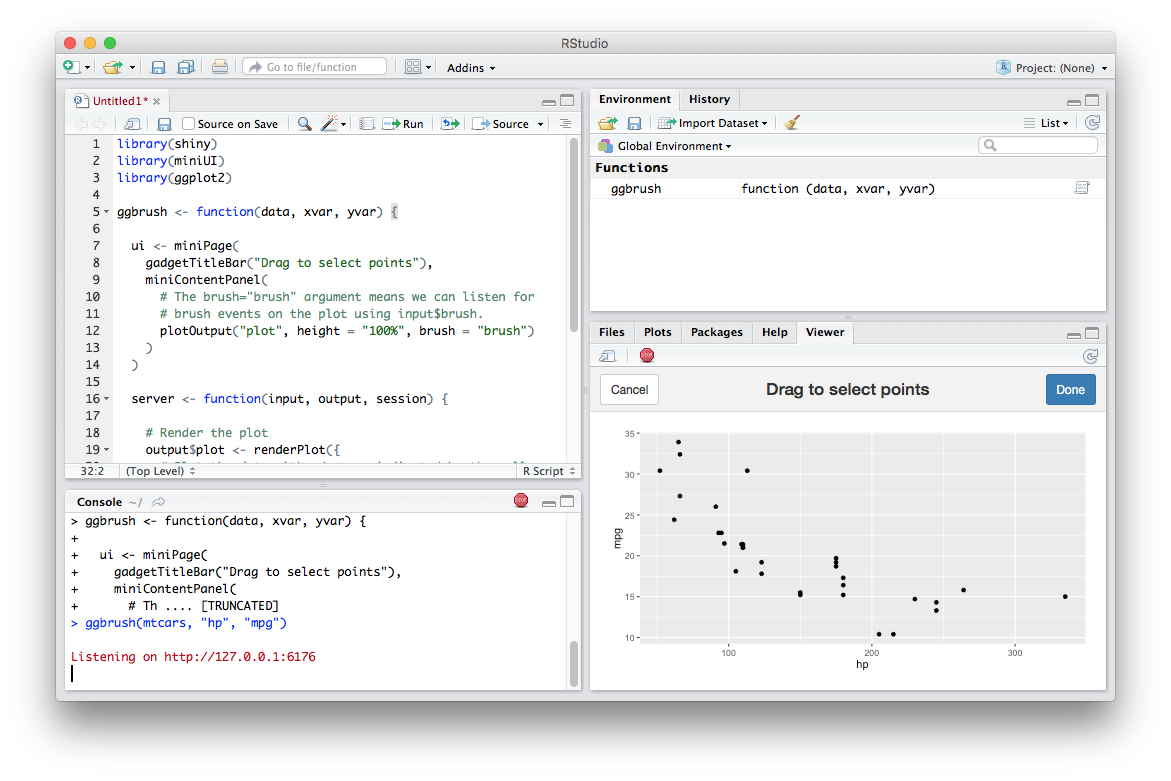
First, let’s take a look at an actual working example. This gadget takes a data frame and the names of two dimensions as input. It uses ggplot2 to render the data as a scatter plot. The user can click and drag to select points, and hit “Done” to return the relevant observations.
Try sourcing this code in your R session:
library(shiny)
library(miniUI)
library(ggplot2)

ggbrush <- function(data, xvar, yvar) {

  ui <- miniPage(
    gadgetTitleBar("Drag to select points"),
    miniContentPanel(
      # The brush="brush" argument means we can listen for
      # brush events on the plot using input$brush.
      plotOutput("plot", height = "100%", brush = "brush")
    )
  )

  server <- function(input, output, session) {

    # Render the plot
    output$plot <- renderPlot({
      # Plot the data with x/y vars indicated by the caller.
      ggplot(data, aes_string(xvar, yvar)) + geom_point()
    })

    # Handle the Done button being pressed.
    observeEvent(input$done, {
      # Return the brushed points. See ?shiny::brushedPoints.
      stopApp(brushedPoints(data, input$brush))
    })
  }

  runGadget(ui, server)
}
Now, run ggbrush(mtcars, "hp", "mpg") in the R console. You should see something like this:

Click and drag on the plot, then click the Done button. You’ll see the selection you made printed to the console in data frame form.
Hint: If you ever run a gadget (or indeed, any R console command) but forget to save the result to a variable, don’t worry! R always saves the result of the most recently run top-level expression in the .Last.value variable:
> runif(1)
[1] 0.560866
> num <- .Last.value
> num
[1] 0.560866
Designing Gadget UI
While technically, any kind of Shiny UI could be used for a Shiny Gadget, we’ve created a miniUI package that we think is particularly well suited for Gadget use. We recommend that you start with miniUI based UI for your gadget, unless you have a specific reason not to.
Learn more about creating gadget UI with miniUI in the article Designing Gadget UI.
Viewer options
The runGadget call has a viewer parameter that can be used to control how the gadget will be displayed in RStudio. The shinygadgets package includes functionality for rendering:
In a pane
The example above launched a gadget in RStudio’s Viewer pane. This is the default behavior.

If your gadget has a minimum height below which it doesn’t work properly or looks silly, you can request that Viewer pane be resized to at least that height before displaying:
runGadget(ui, server, viewer = paneViewer(minHeight = 500))In a dialog
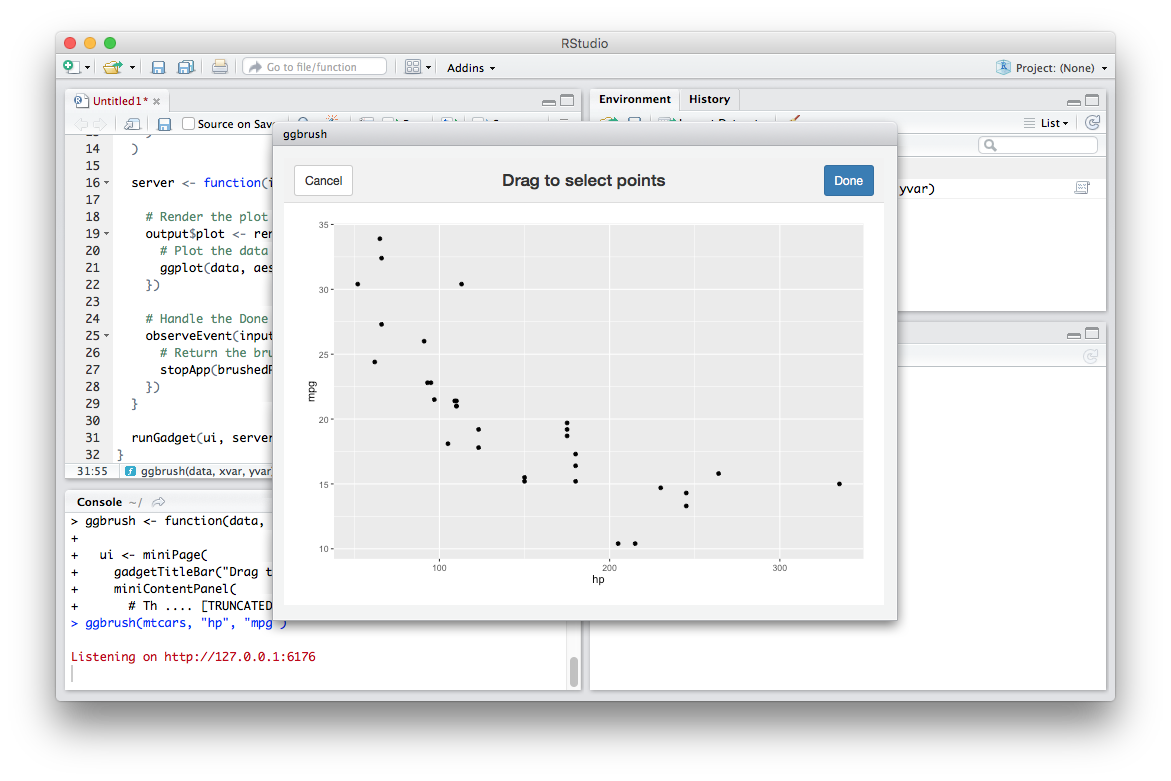
If you have a larger gadget, you can ask RStudio to show a gadget in a modal “dialog” that floats over the top of the other panes:

To opt into this behavior, change the runGadget call to:
runGadget(ui, server, viewer = dialogViewer("ggbrush"))You can pass width and height arguments to dialogViewer to indicate your preferred size (though RStudio is free to render the gadget at a smaller size if the RStudio main window itself is too small to accommodate your size preference).
In a web browser
Finally, if you prefer to launch the gadget in the system’s external browser (like Chrome or Firefox) you can do so by using browserViewer:
runGadget(ui, server, viewer = browserViewer())As an RStudio Addin
After you’ve created a gadget, you can register it as an RStudio Addin, making available from a drop-down menu in RStudio:
![Drop down menu with Select points selected and mouseover saying Iteractively select points from a scatter plot. [addinexamples::ggbrush]](gadgets-addins-menu.png)
To learn how to do this, see the RStudio Addin documentation.
Learn more
For more on this topic, see the following resources:
[Shiny Gadgets: Interactive Tools](https://resources.rstudio.com/webinars/shiny-gadgets