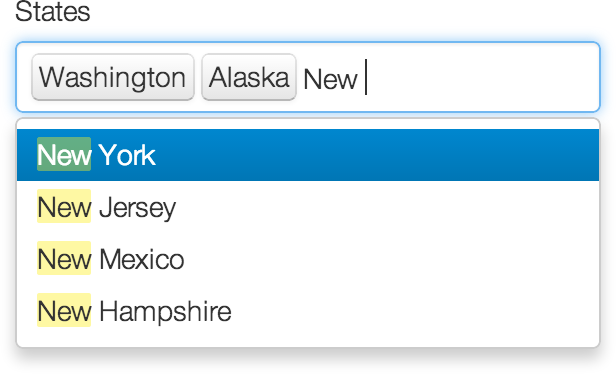
Using selectize input
The JavaScript library selectize.js provides a much more flexible interface compared to the basic select input. It allows you to type and search in the options, use placeholders, control the number of options/items to show/select, and so on. See here for an example app.

To create a selectize input, you can use the function selectizeInput(), and the usage is very similar to selectInput():
selectizeInput(inputId, label, choices, selected = NULL, multiple = FALSE,
               options = NULL)
A major difference between the usage of selectizeInput() and selectInput() is the options argument, which is a list of parameters to initialize the selectize input. Please check out the usage documentation of selectize.js for all the possible parameters. This example shows a side by side comparision between selectize and select input.
When we type in the input box, selectize will start searching for the options that partially match the string we typed. The searching can be done on the client side (default behavior), when all the possible options have been written on the HTML page. It can also be done on the server side, using R to match the string and return results. This is particularly useful when the number of choices is very large. For example, when there are 100,000 choices for the selectize input, it will be slow to write all of them at once into the page, but we can start from an empty selectize input, and only fetch the choices that we may need, which can be much faster. We will introduce both types of the selectize input below.
Client-side selectize
The selectize input returns the item(s) that you selected, but keep in mind that it may also return an empty string when all the selected items are deleted using the key Backspace or Delete.
We can make use of the options argument to specify a list of initialization options. Here are some quick examples:
# allow creation of new items in the drop-down list
selectizeInput(
  'foo', label = NULL, choices = state.name,
  options = list(create = TRUE)
)

# show at most 5 options in the list
selectizeInput(..., options = list(maxOptions = 5))

# allow at most 2 items to be selected
selectizeInput(..., options = list(maxItems = 2))

# add a placeholder in the text box
selectizeInput(..., options = list(placeholder = 'select a state name'))
Of course, you can combine multiple options, e.g.
selectizeInput(..., options = list(maxItems = 3, placeholder = 'hi there'))Server-side selectize
The client-side selectize input relies solely on JavaScript to process searching on typing. The server-side selectize input uses R to process searching, and R will return the filtered data to selectize. To use the server version, you need to create a selectize instance in the UI, and update it to the server version:
# in ui
selectizeInput('foo', choices = NULL, ...)

# in server
server <- function(input, output, session) {
  updateSelectizeInput(session, 'foo', choices = data, server = TRUE)
}
You may use choices = NULL to create an empty selectize instance, so that it will load quickly initially, then use updateSelectize(server = TRUE) to pass the choices data to R. Here data can be an arbitrary R data object, such as a (named) character vector, or a data frame. Note the client-side selectize can only accept a character vector for the choices argument.
What happens when we type in the text box is:
- the character string in the text box is sent to R, and split into multiple keywords using white spaces;
- R matches each keyword in the variable(s) specified in the
searchFieldoption of selectize initialization options; - depending on the
searchConjunctionoption ('and'or'or'), the results from each keyword are combined usingANDorOR; - the first
maxOptionsrecords of thedatais returned (as JSON);
When we use the server version of selectize, we may want to define the render method for selectize, although normally the default rendering method should just work. A custom rendering method allows us to create richer content in the drop-down list, instead of just some plain text options. This example shows how we can render images in the options.
updateSelectizeInput(..., options = list(render = I(
  '{
    option: function(item, escape) {
      // your own code to generate HTML here for each option item
    }
  }'
)))
The options element of the render object is a JavaScript function that has two arguments, item and escape. Please read the selectize.js documentation to understand what they mean. Basically you can treat item as a record in the data that we passed in as choices. For example, if choices = state.name, an item might be
{
  label: "California",
  value: "California"
}
You can define the rendering method for options as
function(item, escape) {
  return "<div>" + escape(item.value) + "</div>";
}
This means we create a div for each of the items, and the div contains their values. This is a very simple example, and we can use more complicated data objects, and write rendering methods accordingly. Here is a quick example:
updateSelectizeInput(
  ...,
  choices = cbind(name = rownames(mtcars), mtcars),
  options = list(render = I(
  '{
    option: function(item, escape) {
      return "<div><strong>" + escape(item.name) + "</strong> (" +
             "MPG: " + item.mpg +
             ", Transmission: " + item.am == 1 ? "automatic" : "manual" + ")"
    }
  }'))
)
Then in the drop-down list, we will see the name of the car in bold text, and the variables mpg and am in the parentheses (e.g. Mazda RX4 (MPG: 21.0, Transmission: manual)).